http://www.ros.org/wiki/pr2/Tutorials/Moving%20the%20arm%20using%20the%20Joint%20Trajectory%20Action
アームの動かし方も、
- 直接モータを動かす
- 角度指令値だけ渡す
- 障害物回避する
などのレベルがあります。最上位がmove_armというスタックです。
今回は角度指令を下位に渡す中くらいのインタフェースをやります。
じゃあ、いつものようにシミュレータを立ち上げます。
そして、以下のようにしてコントローラーが動いているか確かめましょう。
$ rosrun pr2_controller_manager pr2_controller_manager list
r_arm_controller ( running )
となっているので動いていますね。
もし( stopped )であれば、
$ rosrun pr2_controller_manager pr2_controller_manager start r_arm_controller
として動かします。
今回JointTrajectoryActionというactionを使って腕を動かします。
以前actionlibは勉強しましたが、actionlibを知らない人は先に理解しておきましょう。
$ rosnode list
とすると、
/r_arm_controller/joint_trajectory_action_node
がありますね。
こいつを使ってロボットを動かします。
このactionはtrajectory_msgs/JointTrajectoryというメッセージを使います。
$ rosmsg show JointTrajectory
とすると
[trajectory_msgs/JointTrajectory]:
Header header
uint32 seq
time stamp
string frame_id
string[] joint_names
JointTrajectoryPoint[] points
float64[] positions
float64[] velocities
float64[] accelerations
duration time_from_start
となっています。
ヘッダはおいといて、joint_namesで指定したジョイントを、pointsの状態にします。
pointsは通過点列で、positionとvelocityとaccelerationが入れられます。
速度とかは0にすると無視されるみたいです。
ではjoint_namesに何があるかを調べましょう。
$ rosparam get /r_arm_controller/joints
もしくは
$ rosparam get /r_arm_controller/joint_trajectory_action/joints
とすると
[r_shoulder_pan_joint, r_shoulder_lift_joint, r_upper_arm_roll_joint, r_elbow_flex_joint,
r_forearm_roll_joint, r_wrist_flex_joint, r_wrist_roll_joint]
となります。
ここに表示される名前をすべて入れないとJointTrajectory Actionは使えないので注意です。つまりすべてのジョイントに同時に指令を与えないとアームは動きません。
想定外の動きをさせないための安全処理でしょう。
関節名にr_とかいれちゃうのは左右の腕におけるポリモーフィズム効果を低下させるのであまりよくない設計な気がしますがどうなんでしょうか?
rosparamは今まで取り上げていませが、roscoreに含まれるパラメータサーバにアクセスするコマンドです。
$ rosparam set hogehoge
と使ってパラメータのセットもできます。
話もどります。
関節角度と時間の同期の話です。
ロボットが動き出すタイミングがヘッダのstampです。
この時刻になるとロボットは最初の姿勢に向けて動き始めます。
pointsにあるtime_from_startの時間に目標の姿勢になるように動きます。
time_from_startは単調増加していかないといけません。
関節角度と速度は3次スプラインで補間されます。accelerationを使うと4次スプラインにできます。コントローラは純粋に指令地点を通るので、なめらかに動かすためにはちゃんと動くことができる軌道を入れる必要があるようです。
じゃあ、いつものようにパッケージ作りますか。
$ roscd sandbox
$ roscreate-pkg simple_trajectory actionlib roscpp pr2_controllers_msgs
$ roscd simple_trajectory
以下をsrc/simple_trajectory.cppとして保存です。
#include <ros/ros.h>
#include <pr2_controllers_msgs/JointTrajectoryAction.h>
#include <actionlib/client/simple_action_client.h>

typedef actionlib::SimpleActionClient< pr2_controllers_msgs::JointTrajectoryAction > TrajClient;

class RobotArm
{
private:
  // Action client for the joint trajectory action
  // used to trigger the arm movement action
  TrajClient* traj_client_;

public:
  //! Initialize the action client and wait for action server to come up
  RobotArm()
  {
    // tell the action client that we want to spin a thread by default
    traj_client_ = new TrajClient("r_arm_controller/joint_trajectory_action", true);

    // wait for action server to come up
    while(!traj_client_->waitForServer(ros::Duration(5.0))){
      ROS_INFO("Waiting for the joint_trajectory_action server");
    }
  }

  //! Clean up the action client
  ~RobotArm()
  {
    delete traj_client_;
  }

  //! Sends the command to start a given trajectory
  void startTrajectory(pr2_controllers_msgs::JointTrajectoryGoal goal)
  {
    // When to start the trajectory: 1s from now
    goal.trajectory.header.stamp = ros::Time::now() + ros::Duration(1.0);
    traj_client_->sendGoal(goal);
  }

  //! Generates a simple trajectory with two waypoints, used as an example
  /*! Note that this trajectory contains two waypoints, joined together
      as a single trajectory. Alternatively, each of these waypoints could
      be in its own trajectory - a trajectory can have one or more waypoints
      depending on the desired application.
  */
  pr2_controllers_msgs::JointTrajectoryGoal armExtensionTrajectory()
  {
    //our goal variable
    pr2_controllers_msgs::JointTrajectoryGoal goal;

    // First, the joint names, which apply to all waypoints
    goal.trajectory.joint_names.push_back("r_shoulder_pan_joint");
    goal.trajectory.joint_names.push_back("r_shoulder_lift_joint");
    goal.trajectory.joint_names.push_back("r_upper_arm_roll_joint");
    goal.trajectory.joint_names.push_back("r_elbow_flex_joint");
    goal.trajectory.joint_names.push_back("r_forearm_roll_joint");
    goal.trajectory.joint_names.push_back("r_wrist_flex_joint");
    goal.trajectory.joint_names.push_back("r_wrist_roll_joint");

    // We will have two waypoints in this goal trajectory
    goal.trajectory.points.resize(2);

    // First trajectory point
    // Positions
    int ind = 0;
    goal.trajectory.points[ind].positions.resize(7);
    goal.trajectory.points[ind].positions[0] = 0.0;
    goal.trajectory.points[ind].positions[1] = 0.0;
    goal.trajectory.points[ind].positions[2] = 0.0;
    goal.trajectory.points[ind].positions[3] = 0.0;
    goal.trajectory.points[ind].positions[4] = 0.0;
    goal.trajectory.points[ind].positions[5] = 0.0;
    goal.trajectory.points[ind].positions[6] = 0.0;
    // Velocities
    goal.trajectory.points[ind].velocities.resize(7);
    for (size_t j = 0; j < 7; ++j)
    {
      goal.trajectory.points[ind].velocities[j] = 0.0;
    }
    // To be reached 1 second after starting along the trajectory
    goal.trajectory.points[ind].time_from_start = ros::Duration(1.0);

    // Second trajectory point
    // Positions
    ind += 1;
    goal.trajectory.points[ind].positions.resize(7);
    goal.trajectory.points[ind].positions[0] = -0.3;
    goal.trajectory.points[ind].positions[1] = 0.2;
    goal.trajectory.points[ind].positions[2] = -0.1;
    goal.trajectory.points[ind].positions[3] = -1.2;
    goal.trajectory.points[ind].positions[4] = 1.5;
    goal.trajectory.points[ind].positions[5] = -0.3;
    goal.trajectory.points[ind].positions[6] = 0.5;
    // Velocities
    goal.trajectory.points[ind].velocities.resize(7);
    for (size_t j = 0; j < 7; ++j)
    {
      goal.trajectory.points[ind].velocities[j] = 0.0;
    }
    // To be reached 2 seconds after starting along the trajectory
    goal.trajectory.points[ind].time_from_start = ros::Duration(2.0);

    //we are done; return the goal
    return goal;
  }

  //! Returns the current state of the action
  actionlib::SimpleClientGoalState getState()
  {
    return traj_client_->getState();
  }

};

int main(int argc, char** argv)
{
  // Init the ROS node
  ros::init(argc, argv, "robot_driver");

  RobotArm arm;
  // Start the trajectory
  arm.startTrajectory(arm.armExtensionTrajectory());
  // Wait for trajectory completion
  while(!arm.getState().isDone() && ros::ok())
  {
    usleep(50000);
  }
}
で、いつものように
rosbuild_add_executable(simple_trajectory src/simple_trajectory.cpp)
をCMakeLists.txtに加えてmakeです。

こんなんなれば成功です。
中身は難しいところないんで、いろいろ試して遊んでみましょう。
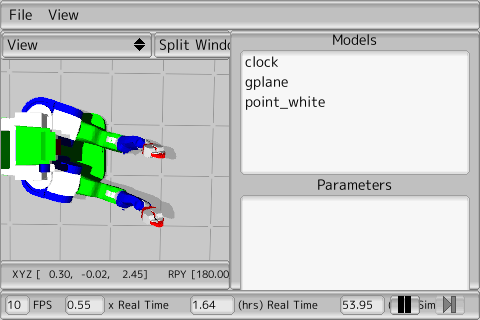

試しに両腕動かしてみるとこんな感じになりました。
うーん、テンションあがってきますね。
今回は以上です。
はじめまして。
返信削除ROSの勉強をしており、いつも参考にさせて頂いています。
ROSの逆運動学についての質問なのですが、3次元の位置を入力したら、逆運動学を解いてサーボモータdynamixelの関節角を動かすノードを作成したいと思っています。
逆運動学に関するパッケージとしてはpr2のものはあるようなので、その逆運動学の部分を自分のロボットのものに改造して使うことを考えています。
また、dynamixelの方にコマンドを与えれば動くようにすることはできています。
以上の方針で進んでいこうと思うのですが、有用そうなパッケージや方針があれば教えていただきたいです。
よろしくお願いいたします。
moveitを使うのが普通なんでしょうが、私はあまり詳しくないです。
返信削除IKだけならopenraveのikfastが有名ですし、使うのも簡単だと思います。