@longjie0723 さんがm3pi robotというものを買うと言っていたので
きっと面白いものだろうと思って買ってみました。
(@longjie0723さんありがとうございます。)
http://www.pololu.com/catalog/product/2153
流行りの(ちょっと古い?)mbedというマイコンが載った小型ロボットです。
mbedの特徴はブラウザでプログラムが書ける、Ether使える、USBホスト機能ありなどですかね。
センサはライントレース用の光センサがついています。
いろいろ拡張ができそうです。
手のひらサイズでものすごく速く動きます。
とりあえず試しにLCDにOTLと表示したり、LEDつけて暴れさせたりして遊んでみました。
プログラムもC++で書けて非常に簡単です。
既存のロボットだと7万円〜30万円くらいしますから(もちろんセンサ数とか全然違うかもしれませんが)
プログラマブルな小型ロボットとしてはいい感じじゃないでしょうか?
2011年8月28日日曜日
2011年8月25日木曜日
Point Cloud Libraryを試す(その5:ユークリッドクラスター抽出)
いい加減PCLも飽きてきましたが、これもやっちゃいましょう。
クラスタリングです。
画像処理でもラベリングは結構使うと思います。
それの3D版です。
Euclidean Cluster Extraction
http://pointclouds.org/documentation/tutorials/cluster_extraction.php#cluster-extraction
こちらのチュートリアルのほうがシンプルですが、私は可視化したかったので↓のように少し改造してビューワを付けました。
$ wget http://dev.pointclouds.org/attachments/download/157/table_scene_lms400.pcd
して、以下をcluster_extraction.cppとして保存です。
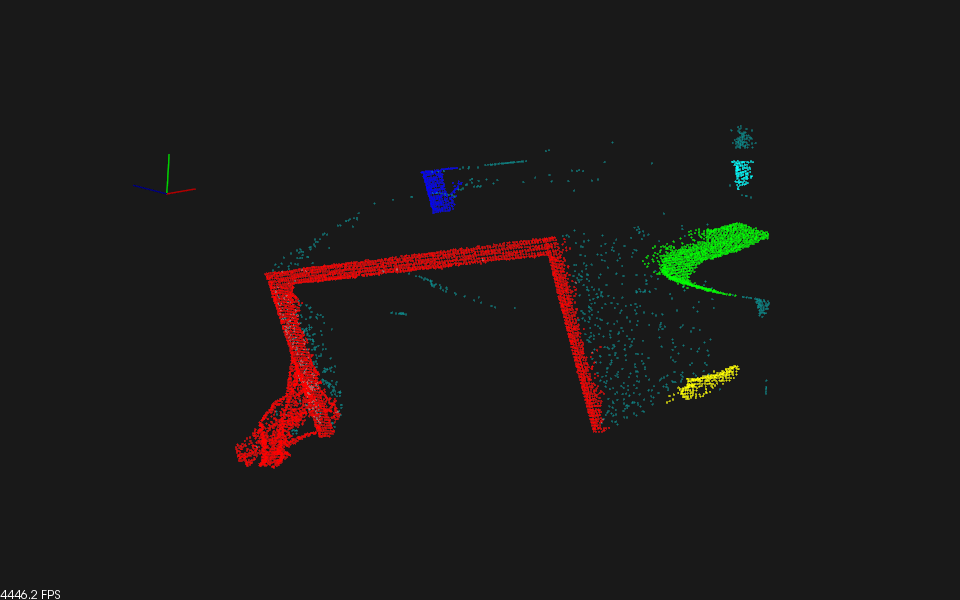
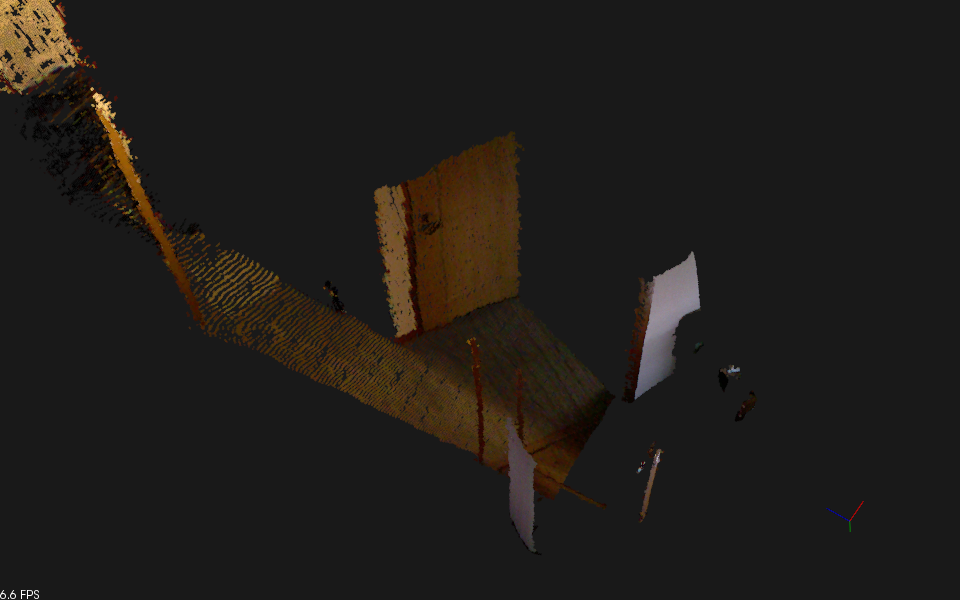
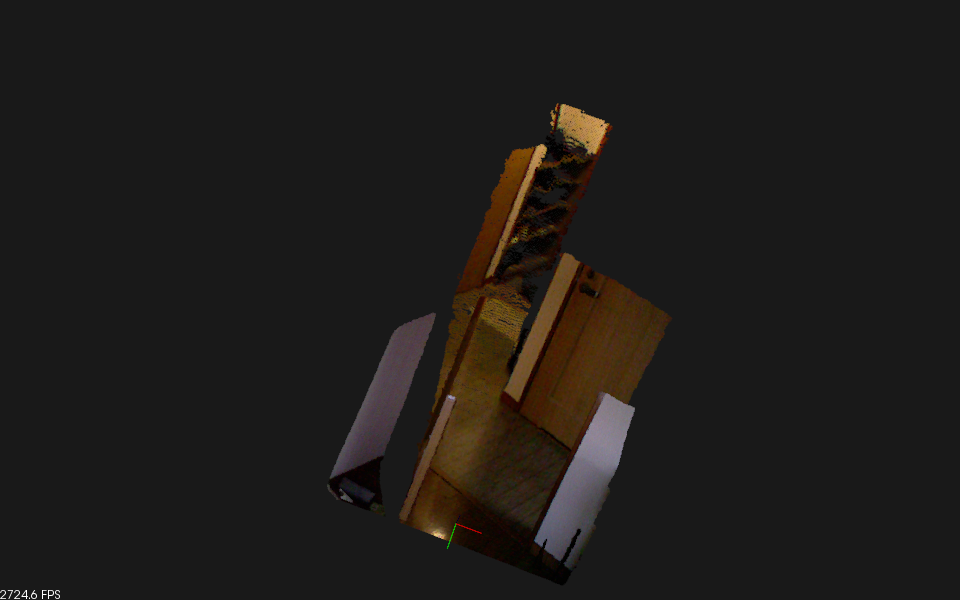
するとこんな感じです。

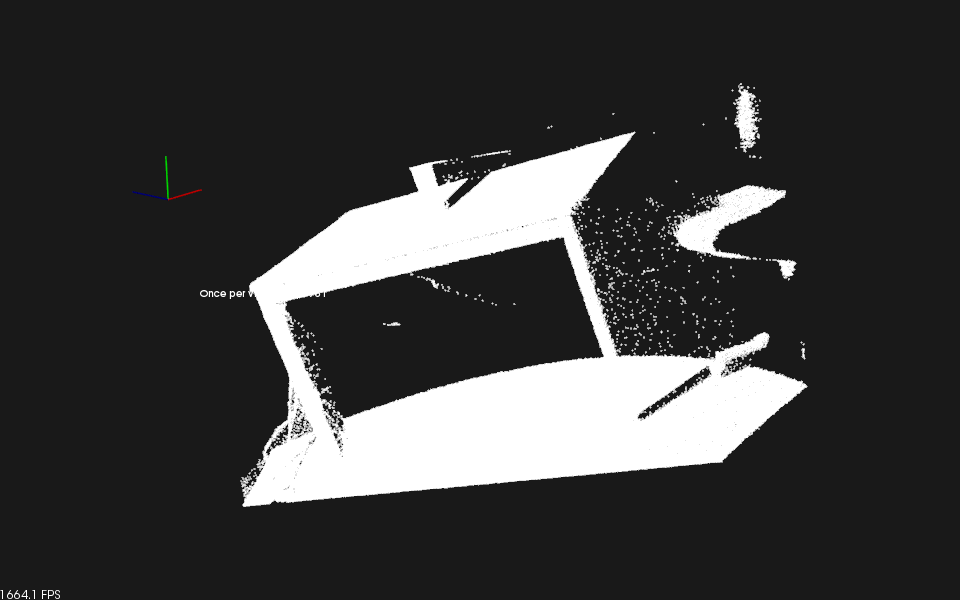
ちなみに元データはこんな感じ。テーブル上面と床が削除されています。

少しだけコードを読むと、
最初にポイントクラウドをファイルから読み込み、pcl::VexelGridを使ってダウンサンプリングしています。
ダウンサンプリングのチュートリアルもありますが簡単なので飛ばしました。
setLeafSizeで10mm刻みのグリッドでサンプリングしていますね。
次に前回やった平面検出で平面を削除しています。
複数の平面検出をどうやるのかと思ったら、検出した領域を削除して、削除したもに対してもう一度検出することでやっているみたいです。
while(...)のところです。
で、今回のキモはpcl::KdTreeを使ってEuclideanClusterEtractionしているところです。
setClusterToleranceでマージする最大距離を指定して、最小、最大のパーティクル数を指定しているようです。
CMakeListx.txtはいつもと同じです。
ここまでで、机の上にある物体をラベリングして認識することができるようになりました。
あとはフィルタのチュートリアルでもやればひと通り終わりかな?
大体感じはつかめたのでPCL本体はこれくらいにしておきましょう。
これで少しは面白いことができるかもしれません。
次はROSとのからみを見てみます。
クラスタリングです。
画像処理でもラベリングは結構使うと思います。
それの3D版です。
Euclidean Cluster Extraction
http://pointclouds.org/documentation/tutorials/cluster_extraction.php#cluster-extraction
こちらのチュートリアルのほうがシンプルですが、私は可視化したかったので↓のように少し改造してビューワを付けました。
$ wget http://dev.pointclouds.org/attachments/download/157/table_scene_lms400.pcd
して、以下をcluster_extraction.cppとして保存です。
#include <pcl/ModelCoefficients.h>
#include <pcl/point_types.h>
#include <pcl/io/pcd_io.h>
#include <pcl/features/normal_3d.h>
#include <pcl/filters/extract_indices.h>
#include <pcl/filters/voxel_grid.h>
#include <pcl/kdtree/kdtree.h>
#include <pcl/sample_consensus/method_types.h>
#include <pcl/sample_consensus/model_types.h>
#include <pcl/segmentation/sac_segmentation.h>
#include <pcl/segmentation/extract_clusters.h>
#include <pcl/visualization/cloud_viewer.h>


int
main (int argc, char** argv)
{
  // Read in the cloud data
  pcl::PCDReader reader;
  pcl::PointCloud<pcl::PointXYZ>::Ptr cloud (new pcl::PointCloud<pcl::PointXYZ>);
  reader.read ("table_scene_lms400.pcd", *cloud);
  std::cout << "PointCloud before filtering has: " << cloud->points.size () << " data points." << std::endl; //*

  // Create the filtering object: downsample the dataset using a leaf size of 1cm
  pcl::VoxelGrid<pcl::PointXYZ> vg;
  pcl::PointCloud<pcl::PointXYZ>::Ptr cloud_filtered (new pcl::PointCloud<pcl::PointXYZ>);
  vg.setInputCloud (cloud);
  vg.setLeafSize (0.01, 0.01, 0.01);
  vg.filter (*cloud_filtered);
  std::cout << "PointCloud after filtering has: " << cloud_filtered->points.size ()  << " data points." << std::endl; //*

  // Create the segmentation object for the planar model and set all the parameters
  pcl::SACSegmentation<pcl::PointXYZ> seg;
  pcl::PointIndices::Ptr inliers (new pcl::PointIndices);
  pcl::ModelCoefficients::Ptr coefficients (new pcl::ModelCoefficients);
  pcl::PointCloud<pcl::PointXYZ>::Ptr cloud_plane (new pcl::PointCloud<pcl::PointXYZ> ());
  pcl::PCDWriter writer;
  seg.setOptimizeCoefficients (true);
  seg.setModelType (pcl::SACMODEL_PLANE);
  seg.setMethodType (pcl::SAC_RANSAC);
  seg.setMaxIterations (100);
  seg.setDistanceThreshold (0.02);

  int i=0, nr_points = cloud_filtered->points.size ();
  while (cloud_filtered->points.size () > 0.3 * nr_points)
    {
      // Segment the largest planar component from the remaining cloud
      seg.setInputCloud(cloud_filtered);
      seg.segment (*inliers, *coefficients); //*
      if (inliers->indices.size () == 0)
	{
	  std::cout << "Could not estimate a planar model for the given dataset." << std::endl;
	  break;
	}

      // Extract the planar inliers from the input cloud
      pcl::ExtractIndices<pcl::PointXYZ> extract;
      extract.setInputCloud (cloud_filtered);
      extract.setIndices (inliers);
      extract.setNegative (false);

      // Write the planar inliers to disk
      extract.filter (*cloud_plane); //*
      std::cout << "PointCloud representing the planar component: " << cloud_plane->points.size () << " data points." << std::endl;

      // Remove the planar inliers, extract the rest
      extract.setNegative (true);
      extract.filter (*cloud_filtered); //*
    }

  // Creating the KdTree object for the search method of the extraction
  pcl::KdTree<pcl::PointXYZ>::Ptr tree (new pcl::KdTreeFLANN<pcl::PointXYZ>);
  tree->setInputCloud (cloud_filtered);

  std::vector<pcl::PointIndices> cluster_indices;
  pcl::EuclideanClusterExtraction<pcl::PointXYZ> ec;
  ec.setClusterTolerance (0.02); // 2cm
  ec.setMinClusterSize (100);
  ec.setMaxClusterSize (25000);
  ec.setSearchMethod (tree);
  ec.setInputCloud( cloud_filtered);
  ec.extract (cluster_indices);

  int j = 0;
  float colors[6][3] ={{255, 0, 0}, {0,255,0}, {0,0,255}, {255,255,0}, {0,255,255}, {255,0,255}};
  pcl::visualization::CloudViewer viewer("cluster viewer");
  pcl::PointCloud<pcl::PointXYZRGB>::Ptr cloud_cluster(new pcl::PointCloud<pcl::PointXYZRGB>);
  pcl::copyPointCloud(*cloud_filtered, *cloud_cluster);
  for (std::vector<pcl::PointIndices>::const_iterator it = cluster_indices.begin (); it != cluster_indices.end (); ++it)
    {
      for (std::vector<int>::const_iterator pit = it->indices.begin (); pit != it->indices.end (); pit++) {
	cloud_cluster->points[*pit].r = colors[j%6][0];
	cloud_cluster->points[*pit].g = colors[j%6][1];
	cloud_cluster->points[*pit].b = colors[j%6][2];
      }
      std::cout << "PointCloud representing the Cluster: " << cloud_cluster->points.size () << " data points." << std::endl;
      std::stringstream ss;
      ss << "cloud_cluster_" << j << ".pcd";
      writer.write<pcl::PointXYZRGB> (ss.str (), *cloud_cluster, false); //*
      j++;
    }
  viewer.showCloud (cloud_cluster);
  while (!viewer.wasStopped())
    {
      sleep (1);
    }


  return (0);
}
するとこんな感じです。
ちなみに元データはこんな感じ。テーブル上面と床が削除されています。
少しだけコードを読むと、
最初にポイントクラウドをファイルから読み込み、pcl::VexelGridを使ってダウンサンプリングしています。
ダウンサンプリングのチュートリアルもありますが簡単なので飛ばしました。
setLeafSizeで10mm刻みのグリッドでサンプリングしていますね。
次に前回やった平面検出で平面を削除しています。
複数の平面検出をどうやるのかと思ったら、検出した領域を削除して、削除したもに対してもう一度検出することでやっているみたいです。
while(...)のところです。
で、今回のキモはpcl::KdTreeを使ってEuclideanClusterEtractionしているところです。
setClusterToleranceでマージする最大距離を指定して、最小、最大のパーティクル数を指定しているようです。
CMakeListx.txtはいつもと同じです。
ここまでで、机の上にある物体をラベリングして認識することができるようになりました。
あとはフィルタのチュートリアルでもやればひと通り終わりかな?
大体感じはつかめたのでPCL本体はこれくらいにしておきましょう。
これで少しは面白いことができるかもしれません。
次はROSとのからみを見てみます。
2011年8月24日水曜日
Point Cloud Libraryを試す(その4:平面抽出)
今回はポイントクラウドから平面を抽出します。
その前に、前回使ったPointXYZRGBの色の部分がfloat rgbとなっていて気になったので調べてみました。
CMakeLists.txtはいつもと同じです。


その前に、前回使ったPointXYZRGBの色の部分がfloat rgbとなっていて気になったので調べてみました。
// pack r/g/b into rgb
 uint8_t r = 255, g = 0, b = 0;    // Example: Red color
 uint32_t rgb = ((uint32_t)r << 16 | (uint32_t)g << 8 | (uint32_t)b);
 p.rgb = *reinterpret_cast<float*>(&rgb);
↑のような感じで使うみたいです。
悪名高きreinterpret_castか!と思ったら、
ver.1.1.0からはr,g,b変数も使えるみたいで、
point.r = 255;
point.g = 100;
point.b = 10;
みたいに指定できるようです。
という小ネタを挟みまして、今回は平面検出です。
↓のようにPointCloudから平面っぽいところを切りだしてくれるはずです。
チュートリアルはこちら
チュートリアルにあるコードは簡単なんですが、ビューワが付いていないので、ビューワを付けてみました。
以下をplanar_segmentation.cppとして保存してください。
以下をplanar_segmentation.cppとして保存してください。
#include <iostream>
#include <pcl/ModelCoefficients.h>
#include <pcl/io/pcd_io.h>
#include <pcl/point_types.h>
#include <pcl/sample_consensus/method_types.h>
#include <pcl/sample_consensus/model_types.h>
#include <pcl/segmentation/sac_segmentation.h>
#include <pcl/visualization/cloud_viewer.h>

int
main (int argc, char** argv)
{
  pcl::PointCloud<pcl::PointXYZRGB> cloud;

  // Fill in the cloud data
  cloud.width  = 15;
  cloud.height = 10;
  cloud.points.resize (cloud.width * cloud.height);

  // Generate the data
  size_t i;
  for (i = 0; i < cloud.points.size ()/2; ++i)
    {
      // 平面におく
      cloud.points[i].x = 1024 * rand () / (RAND_MAX + 1.0);
      cloud.points[i].y = 1024 * rand () / (RAND_MAX + 1.0);
      cloud.points[i].z = 0.1 * rand () / (RAND_MAX + 1.0);
      cloud.points[i].r = 255;
      cloud.points[i].g = 255;
      cloud.points[i].b = 255;
    }

  for (; i < cloud.points.size (); ++i)
    {
      // ちらばらせる
      cloud.points[i].x = 1024 * rand () / (RAND_MAX + 1.0);
      cloud.points[i].y = 1024 * rand () / (RAND_MAX + 1.0);
      cloud.points[i].z = 1024 * rand () / (RAND_MAX + 1.0);
      cloud.points[i].r = 255;
      cloud.points[i].g = 255;
      cloud.points[i].b = 255;
    }

  // Set a few outliers
  cloud.points[0].z = 2.0;
  cloud.points[3].z = -2.0;
  cloud.points[6].z = 4.0;

  std::cerr << "Point cloud data: " << cloud.points.size () << " points" << std::endl;
  for (size_t i = 0; i < cloud.points.size (); ++i)
    std::cerr << "    " << cloud.points[i].x << " "
     << cloud.points[i].y << " "
     << cloud.points[i].z << std::endl;

  pcl::ModelCoefficients::Ptr coefficients (new pcl::ModelCoefficients);
  pcl::PointIndices::Ptr inliers (new pcl::PointIndices);
  // Create the segmentation object
  pcl::SACSegmentation<pcl::PointXYZRGB> seg;
  // Optional
  seg.setOptimizeCoefficients (true);
  // Mandatory
  seg.setModelType (pcl::SACMODEL_PLANE);
  seg.setMethodType (pcl::SAC_RANSAC);
  seg.setDistanceThreshold (0.1);

  seg.setInputCloud (cloud.makeShared ());
  seg.segment (*inliers, *coefficients);

  if (inliers->indices.size () == 0)
    {
      PCL_ERROR ("Could not estimate a planar model for the given dataset.");
      return (-1);
    }

  std::cerr << "Model coefficients: " << coefficients->values[0] << " "
   << coefficients->values[1] << " "
   << coefficients->values[2] << " "
   << coefficients->values[3] << std::endl;

  std::cerr << "Model inliers: " << inliers->indices.size () << std::endl;
  for (size_t i = 0; i < inliers->indices.size (); ++i) {
    std::cerr << inliers->indices[i] << "    " << cloud.points[inliers->indices[i]].x << " "
     << cloud.points[inliers->indices[i]].y << " "
     << cloud.points[inliers->indices[i]].z << std::endl;
    cloud.points[inliers->indices[i]].r = 255;
    cloud.points[inliers->indices[i]].g = 0;
    cloud.points[inliers->indices[i]].b = 0;
  }
  pcl::visualization::CloudViewer viewer("Cloud Viewer");

  viewer.showCloud(cloud.makeShared());

  while (!viewer.wasStopped ())
    {

    }

  return (0);
}
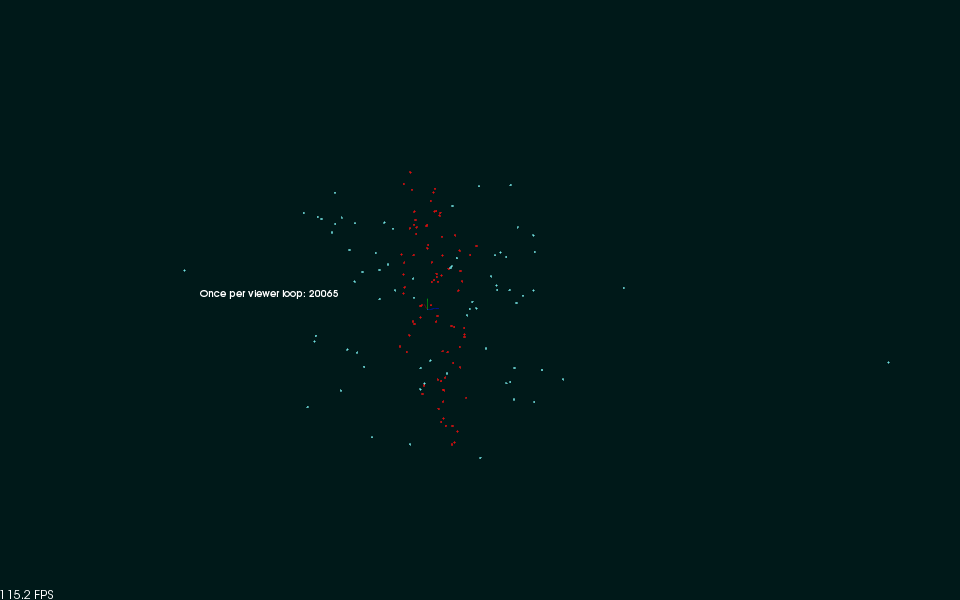
するとこんな感じで平面っぽいところにあるポイントが赤く表示されました。CMakeLists.txtはいつもと同じです。
$ cmake .
$ make
でビルドして、
$ ./planar_segmentation
で実行してみます。
SACSegmentationというClassが今回の本質のようです。ここにSACMODEL_PLANE=平面モデルを指定したり、
setDistanceThresholdでモデルとの誤差の閾値を指定しています。setMethodTypeで計算方法を選択(今回はSAC_RANSAC)しています。RANSACは確率的なモデル推定だったきがします。
coefficients->valuesに入っているのは推定されたモデル
ax+by+cz+d=0の平面の式になります。
これで平面上にあるポイントが検出できました。
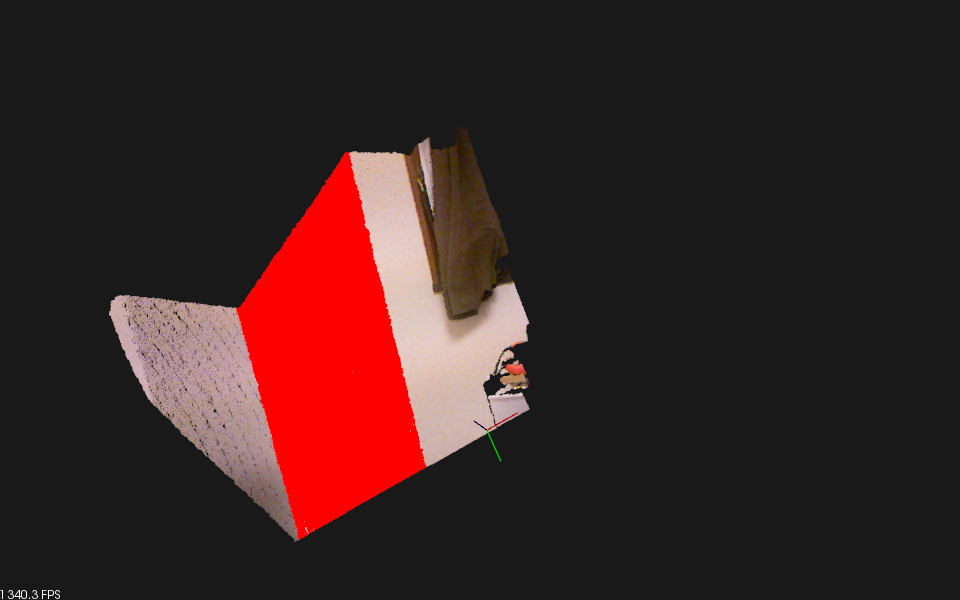
さらにKinectでやってみました。前回のKinectのキャプチャサンプルに今回のを合体させてみました。
一番広い平面が真っ赤にそまります。これは楽しい!
一応ソースコードです。適当です。
#include <iostream>
#include <pcl/ModelCoefficients.h>
#include <pcl/io/openni_grabber.h>
#include <pcl/io/pcd_io.h>
#include <pcl/point_types.h>
#include <pcl/sample_consensus/method_types.h>
#include <pcl/sample_consensus/model_types.h>
#include <pcl/segmentation/sac_segmentation.h>
#include <pcl/visualization/cloud_viewer.h>

void segmentate(pcl::PointCloud<pcl::PointXYZRGB>& cloud, double threshould) {
  pcl::ModelCoefficients::Ptr coefficients (new pcl::ModelCoefficients);
  pcl::PointIndices::Ptr inliers (new pcl::PointIndices);
  // Create the segmentation object
  pcl::SACSegmentation<pcl::PointXYZRGB> seg;
  // Optional
  seg.setOptimizeCoefficients (true);
  // Mandatory
  seg.setModelType (pcl::SACMODEL_PLANE);
  seg.setMethodType (pcl::SAC_RANSAC);
  seg.setDistanceThreshold (threshould);

  seg.setInputCloud (cloud.makeShared ());
  seg.segment (*inliers, *coefficients);

  for (size_t i = 0; i < inliers->indices.size (); ++i) {
    cloud.points[inliers->indices[i]].r = 255;
    cloud.points[inliers->indices[i]].g = 0;
    cloud.points[inliers->indices[i]].b = 0;
  }
}

 class SimpleOpenNIViewer
 {
   public:
     SimpleOpenNIViewer () : viewer ("PCL OpenNI Viewer") {}

     void cloud_cb_ (const pcl::PointCloud<pcl::PointXYZRGB>::ConstPtr &cloud)
     {
       if (!viewer.wasStopped()) {
  pcl::PointCloud<pcl::PointXYZRGB> segmented_cloud(*cloud);
  segmentate(segmented_cloud, 0.01);
         viewer.showCloud (segmented_cloud.makeShared());
       }
     }

     void run ()
     {
       pcl::Grabber* interface = new pcl::OpenNIGrabber();

       boost::function<void (const pcl::PointCloud<pcl::PointXYZRGB>::ConstPtr&)> f =
         boost::bind (&SimpleOpenNIViewer::cloud_cb_, this, _1);

       interface->registerCallback (f);
       interface->start ();
       while (!viewer.wasStopped())
       {
         sleep (1);
       }

       interface->stop ();
     }

     pcl::visualization::CloudViewer viewer;
 };

 int main ()
 {
   SimpleOpenNIViewer v;
   v.run ();
   return 0;
}2011年8月22日月曜日
Point Cloud Libraryを試す(その3:Kinectからデータ取得)
いよいよKinectを使ってデータを取得してみます。
http://pointclouds.org/documentation/tutorials/openni_grabber.php#openni-grabber
データが取得できれば、これまでやった、ファイルへの保存、ビューワでの表示、がとりあえずできるようになるわけです。
公式のサンプルコードは動かないので↓のように修正しました。
ビューワで表示されます。


さらに
#include<pcl/io/pcd_io.h>
して、cloud_cb_の中に
pcl::io::savePCDFileBinary("kinect.pcd", *cloud);
を追加すればファイルに保存もできますね。
マイフレーム保存してもけっこう軽いです。
次回は平面抽出をやります。
http://pointclouds.org/documentation/tutorials/openni_grabber.php#openni-grabber
データが取得できれば、これまでやった、ファイルへの保存、ビューワでの表示、がとりあえずできるようになるわけです。
公式のサンプルコードは動かないので↓のように修正しました。
#include <pcl/io/openni_grabber.h>
#include <pcl/visualization/cloud_viewer.h>

 class SimpleOpenNIViewer
 {
   public:
     SimpleOpenNIViewer () : viewer ("PCL OpenNI Viewer") {}

     void cloud_cb_ (const pcl::PointCloud<pcl::PointXYZRGB>::ConstPtr &cloud)
     {
       if (!viewer.wasStopped())
         viewer.showCloud (cloud);
     }

     void run ()
     {
       pcl::Grabber* interface = new pcl::OpenNIGrabber();

       boost::function<void (const pcl::PointCloud<pcl::PointXYZRGB>::ConstPtr&)> f =
         boost::bind (&SimpleOpenNIViewer::cloud_cb_, this, _1);

       interface->registerCallback (f);

       interface->start ();

       while (!viewer.wasStopped())
       {
         sleep (1);
       }

       interface->stop ();
     }

     pcl::visualization::CloudViewer viewer;
 };

 int main ()
 {
   SimpleOpenNIViewer v;
   v.run ();
   return 0;
 }
ビューワで表示されます。
さらに
#include<pcl/io/pcd_io.h>
して、cloud_cb_の中に
pcl::io::savePCDFileBinary("kinect.pcd", *cloud);
を追加すればファイルに保存もできますね。
マイフレーム保存してもけっこう軽いです。
次回は平面抽出をやります。
2011年8月21日日曜日
Point Cloud Libraryを試す(その2:ビューワ編)
前回ファイルの書き込みをしました。
今回は読み込みを飛ばして可視化をします。
可視化できないと何をやっているのかさっぱりなので。
http://pointclouds.org/documentation/tutorials/cloud_viewer.php#cloud-viewer
前回のコードを少し書き換えて、ビューワのコードをいれてみました。
CMakeLists.txtは以下のような感じ。
$ ./pcl_view_test
とすると以下のようなビューワが立ち上がります。
マウスを駆使してうまく表示します。ホイールで縮小するとよさそうです。

今回は読み込みを飛ばして可視化をします。
可視化できないと何をやっているのかさっぱりなので。
http://pointclouds.org/documentation/tutorials/cloud_viewer.php#cloud-viewer
前回のコードを少し書き換えて、ビューワのコードをいれてみました。
#include <iostream>
#include <pcl/io/pcd_io.h>
#include <pcl/point_types.h>
#include <pcl/visualization/cloud_viewer.h> // 追加

int
  main (int argc, char** argv)
{
  pcl::PointCloud<pcl::PointXYZ> cloud;

  // Fill in the cloud data
  cloud.width    = 5;
  cloud.height   = 1;
  cloud.is_dense = false;
  cloud.points.resize (cloud.width * cloud.height);

  for (size_t i = 0; i < cloud.points.size (); ++i)
  {
    cloud.points[i].x = 1024 * rand () / (RAND_MAX + 1.0);
    cloud.points[i].y = 1024 * rand () / (RAND_MAX + 1.0);
    cloud.points[i].z = 1024 * rand () / (RAND_MAX + 1.0);
  }
  // 追加
  pcl::visualization::CloudViewer viewer ("Simple Cloud Viewer");
  viewer.showCloud (cloud.makeShared());
  while (!viewer.wasStopped ()) {
  }

  return (0);
}
CMakeLists.txtは以下のような感じ。
cmake_minimum_required(VERSION 2.8 FATAL_ERROR)

project(pcd_write)

find_package(PCL 1.1 REQUIRED)

include_directories(${PCL_INCLUDE_DIRS})
link_directories(${PCL_LIBRARY_DIRS})
add_definitions(${PCL_DEFINITIONS})

add_executable (pcd_write pcd_write.cpp)
add_executable (pcl_view_test pcl_view_test.cpp)

target_link_libraries (pcd_write ${PCL_COMMON_LIBRARIES} ${PCL_IO_LIBRARIES})
target_link_libraries (pcl_view_test ${PCL_LIBRARIES})
$ ./pcl_view_test
とすると以下のようなビューワが立ち上がります。
マウスを駆使してうまく表示します。ホイールで縮小するとよさそうです。
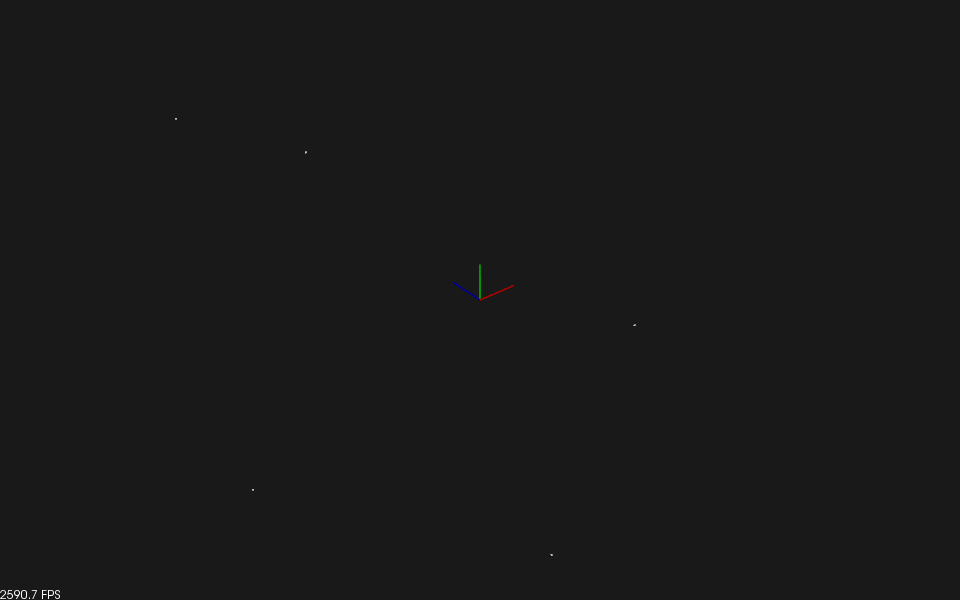
見えないでしょうがちっちゃい5つの白い点が作成したポイントクラウドです。
ためしに点を100x100くらいにしてみます。widthとheightを100にしてみます。

おー、ポイントクラウドって感じですね。
公式のチュートリアルはこちらです。
もう少し詳しいので必要になったら参照したいと思います。
http://pointclouds.org/documentation/tutorials/cloud_viewer.php#cloud-viewer
ためしに点を100x100くらいにしてみます。widthとheightを100にしてみます。
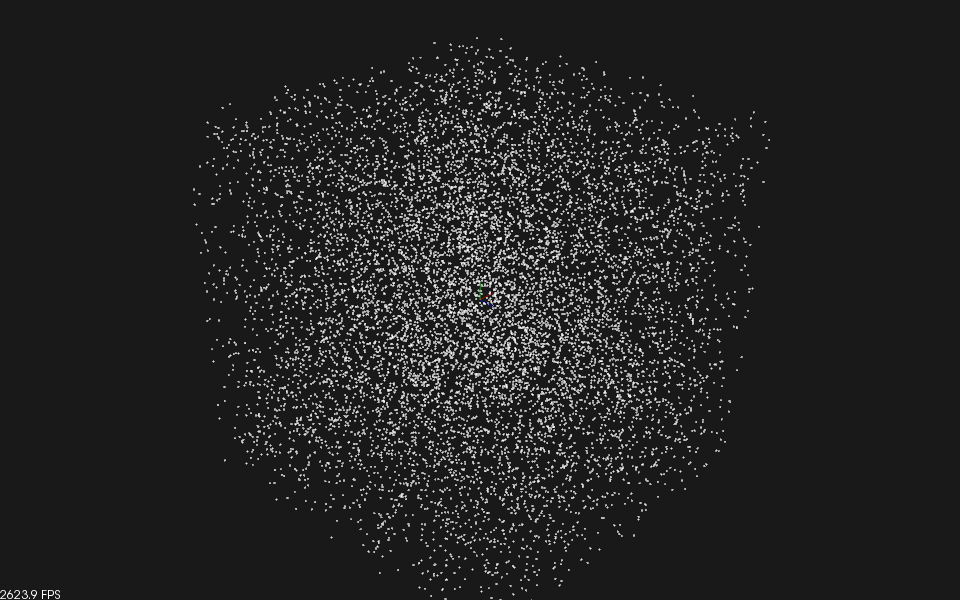
おー、ポイントクラウドって感じですね。
公式のチュートリアルはこちらです。
もう少し詳しいので必要になったら参照したいと思います。
http://pointclouds.org/documentation/tutorials/cloud_viewer.php#cloud-viewer
2011年8月20日土曜日
Point Cloud Libraryを試す(その1:インストール&コンパイルテスト編)
ROSを使わない前提でのインストールを説明します。
(ROSでのPCLのインストールは簡単です。
$ sudo apt-get install ros-diamondback-point-cloud-perception
だけ。ROSでは/usr/とかにインストールしないので、以下のインストール方法と競合はしません。)
相変わらず環境はUbuntu 10.04です。
http://pointclouds.org/downloads/linux.html
test_pcd.pcdというファイルができているはずです。
中身は
pcl::PointXYZの定義は
となっています。
たんなる3次元座標ですね。この他にも色情報を含んだPointXYZRGBなど、さまざまなタイプがpcl/point_types.hに定義されています。
pcl::PointCloudクラスはwidthやheightを持ちます。これは画像のアナロジーになっているみたいです。
Kinectでは距離画像(画素が距離情報の画像)を取れるので親和性が高いのでしょう。
is_denseはTrueの場合にNaNやInfが値として入っていないことを保証するようです。
あとstd_msgs::Header型のheaderという変数も持ちます。これはROSのものと同じ型です。
ROSに依存していないのになぜこれが使えるかというと、
/usr/include/pcl-1.1/の下にstd_msgsとsensor_msgsがインストールされているからです。
非常に気持ち悪いですね。
あとは
pcl::io::savePCDFileASCII関数でファイルに出力しています。非常に簡単ですね。
(ROSでのPCLのインストールは簡単です。
$ sudo apt-get install ros-diamondback-point-cloud-perception
だけ。ROSでは/usr/とかにインストールしないので、以下のインストール方法と競合はしません。)
相変わらず環境はUbuntu 10.04です。
http://pointclouds.org/downloads/linux.html
sudo add-apt-repository ppa:v-launchpad-jochen-sprickerhof-de/pcl
sudo apt-get update
sudo apt-get install libpcl-1.1-dev
以上でおしまいです。
簡単ですね。
ではまずこれをやります。
Writing Point Cloud data to PCD files (ポイントクラウドデータをPCDファイルに書きこむ)
まず以下の内容をpcd_write.cppというファイル名で保存します。
で、次のようなCMakeLists.txtを作成します。
$ cmake .とするとpcd_writeという実行ファイルができるはずです。
$ make
$ ./pcd_writeして、以下のように表示されればOK
$ ./pcd_write
Saved 5 data points to test_pcd.pcd.
0.352222 -0.151883 -0.106395
-0.397406 -0.473106 0.292602
-0.731898 0.667105 0.441304
-0.734766 0.854581 -0.0361733
-0.4607 -0.277468 -0.916762
test_pcd.pcdというファイルができているはずです。
中身は
# .PCD v.7 - Point Cloud Data file format
VERSION .7
FIELDS x y z
SIZE 4 4 4
TYPE F F F
COUNT 1 1 1
WIDTH 5
HEIGHT 1
VIEWPOINT 0 0 0 1 0 0 0
POINTS 5
DATA ascii
0.35222197 -0.15188313 -0.10639524
-0.3974061 -0.47310591 0.29260206
-0.73189831 0.66710472 0.44130373
-0.73476553 0.85458088 -0.036173344
-0.46070004 -0.2774682 -0.91676188
のようになっています。
たんなる3次元座標ですね。この他にも色情報を含んだPointXYZRGBなど、さまざまなタイプがpcl/point_types.hに定義されています。
pcl::PointCloudクラスはwidthやheightを持ちます。これは画像のアナロジーになっているみたいです。
Kinectでは距離画像(画素が距離情報の画像)を取れるので親和性が高いのでしょう。
is_denseはTrueの場合にNaNやInfが値として入っていないことを保証するようです。
あとstd_msgs::Header型のheaderという変数も持ちます。これはROSのものと同じ型です。
ROSに依存していないのになぜこれが使えるかというと、
/usr/include/pcl-1.1/の下にstd_msgsとsensor_msgsがインストールされているからです。
非常に気持ち悪いですね。
あとは
pcl::io::savePCDFileASCII関数でファイルに出力しています。非常に簡単ですね。
2011年8月19日金曜日
Point Cloud Libraryを試す(その0)
かなり遅くなりましたが今後このブログでPoint Cloud Library (PCL)を試したいと思います。
PCLはKinectやレーザーレンジファインダで獲得できる3次元の点群を使った認識を行うためのライブラリです。(たぶん)
(including filtering, feature estimation, surface reconstruction, registration, model fitting and segmentation)とあります。
HPを見るとスポンサーとして、intel, nvidia, willowなどが並び、日本でも産総研、東大、トヨタが付いているようですね。
私はPCLはかなり前から注目していましたが、正直何に使っていいか分かりませんでした。
Kinectが発売され、誰でも使えるようになり、さらに注目度が増していたわけですが、
やはりどうロボットにいれていいかわからず手がでませんでした。
6軸以上のアームがあれば物体認識に使えるんでしょうけど、
そんなもの持っていませんし、作るにもお金とスキルと時間が必要です。
また、なんとか私が持っているロボット(移動台車、Kinect、2軸アーム)での利用法をさがそうとしていましたが、
やはり思いつきませんでした。
(1つ考えていますが、あまり面白くないです。誰かネタがあったら教えてください。)
でも勉強していくうちに思いつくかもしれない、と思って見切り発車でやっていこうと思います。
PCLはROS依存とROS依存じゃないところをちゃんと意識して作っているっぽいので、ROSじ
ゃない方面からやるか、ROSでやるか、という2つのやり方があると思います。
ドキュメントの再利用性を考えて、ROS非依存で進めて、最後にROSからだとこうなる、という感じで進めようかと思います。
最後にルンバにKinectを載せてなんかやるでしょう。
ではでは。
2011年8月16日火曜日
OpenRTM-asit ROSパッチ(ros port)を使ってルンバを操縦する
前回OpenRTM-aistからROSを使えるようにしました。
次はお決まりですがルンバを動かします。
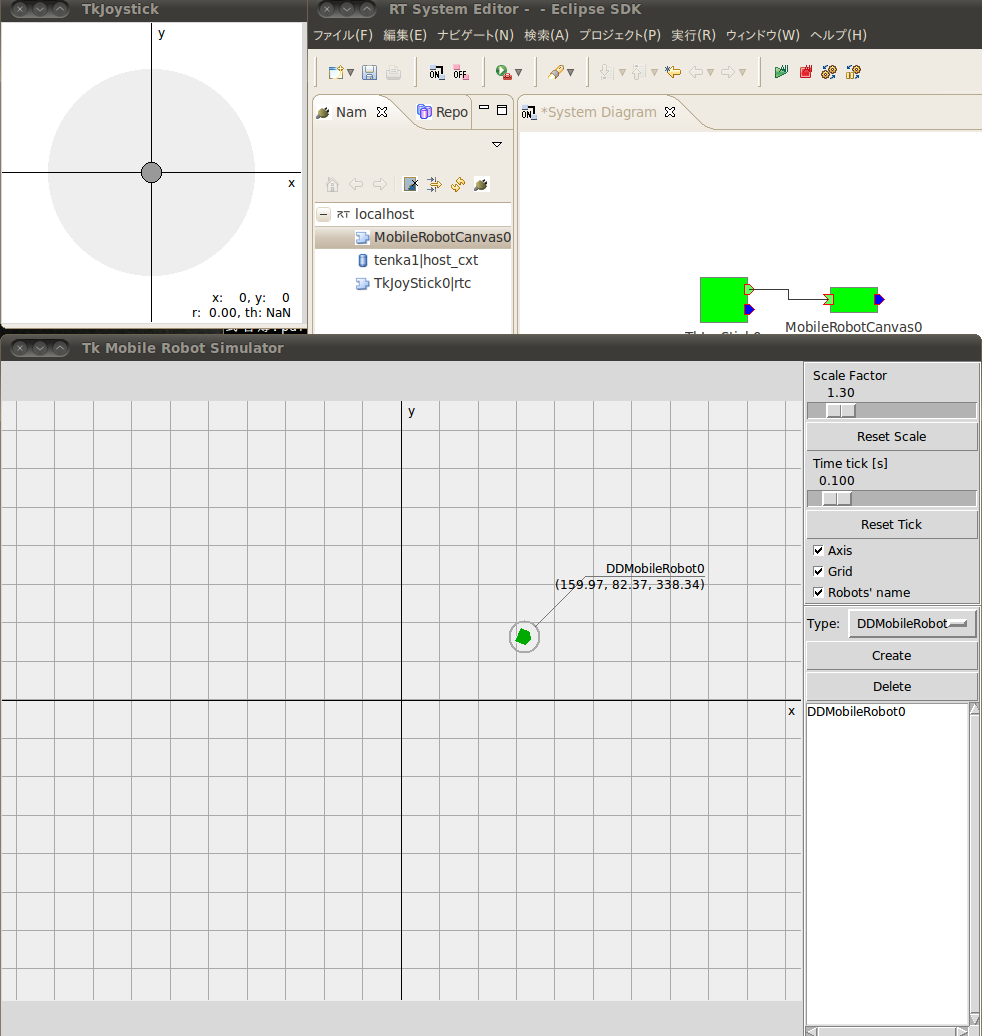
今回はOpenRTM-aistの仮想ジョイスティックコンポーネントを利用してルンバを動かします。
構成としては
TkJoyStick(RTC) -> JoyRTM2velROS(今回作ったコンポーネント)(RTC/ROS) -> いつもの自作ルンバノード(ROS)
という感じです。
TkJoyStickはOpenRTM-aistのサンプルに入っていて、ジョイスティックっぽいGUIです。
面倒なのでビデオ解説です。
JoyRTM2velROSのソースはTkJoyStickからの入力(TimedFloatSeq)をROSのgeometry_msgs/Twist型に変換しているだけです。
やはりOpenRTMとROSは非常に似ていますね。
OpenRTM-aistのコードの自動生成は便利だけど修正がめんどくさいです。
とくにRosPortのように標準ツールでサポートされていないと大変です。
なにかいい方法があれば教えてください。
参考程度にcppのソースファイルだけ貼りつけておきます。
いつも通り適当です。
一応リポジトリに
otl-ros-pkg/otl_nav/JoyRTM2velROS
としておいておきました。
【参考サイト】
http://code.google.com/p/rtm-ros-robotics/wiki/rosport_Example
http://code.google.com/p/rtm-ros-robotics/wiki/RTM_HelloWorldSample
ヘッダファイル
実体(.cpp)
次はお決まりですがルンバを動かします。
今回はOpenRTM-aistの仮想ジョイスティックコンポーネントを利用してルンバを動かします。
構成としては
TkJoyStick(RTC) -> JoyRTM2velROS(今回作ったコンポーネント)(RTC/ROS) -> いつもの自作ルンバノード(ROS)
という感じです。
TkJoyStickはOpenRTM-aistのサンプルに入っていて、ジョイスティックっぽいGUIです。
面倒なのでビデオ解説です。
JoyRTM2velROSのソースはTkJoyStickからの入力(TimedFloatSeq)をROSのgeometry_msgs/Twist型に変換しているだけです。
やはりOpenRTMとROSは非常に似ていますね。
OpenRTM-aistのコードの自動生成は便利だけど修正がめんどくさいです。
とくにRosPortのように標準ツールでサポートされていないと大変です。
なにかいい方法があれば教えてください。
参考程度にcppのソースファイルだけ貼りつけておきます。
いつも通り適当です。
一応リポジトリに
otl-ros-pkg/otl_nav/JoyRTM2velROS
としておいておきました。
【参考サイト】
http://code.google.com/p/rtm-ros-robotics/wiki/rosport_Example
http://code.google.com/p/rtm-ros-robotics/wiki/RTM_HelloWorldSample
ヘッダファイル
// -*- C++ -*-
/*!
 * @file  JoyRTM2velROS.h
 * @brief convert Joystick sample port to ROS twist msg
 * @date  $Date$
 *
 * $Id$
 */

#ifndef JOYRTM2VELROS_H
#define JOYRTM2VELROS_H

#include <rtm/Manager.h>
#include <rtm/DataFlowComponentBase.h>
#include <rtm/CorbaPort.h>
#include <rtm/DataInPort.h>
#include <rtm/DataOutPort.h>
#include <rtm/idl/BasicDataTypeSkel.h>
#include <rtm/idl/ExtendedDataTypesSkel.h>
#include <rtm/idl/InterfaceDataTypesSkel.h>
#include <rtm/RosOutPort.h>
#include "geometry_msgs/Twist.h"

using namespace RTC;

/*!
 * @class JoyRTM2velROS
 * @brief convert Joystick sample port to ROS twist msg
 *
 */
class JoyRTM2velROS
  : public RTC::DataFlowComponentBase
{
 public:
  /*!
   * @brief constructor
   * @param manager Maneger Object
   */
  JoyRTM2velROS(RTC::Manager* manager);

  /*!
   * @brief destructor
   */
  ~JoyRTM2velROS();

  /***
   *
   * The initialize action (on CREATED->ALIVE transition)
   * formaer rtc_init_entry()
   *
   * @return RTC::ReturnCode_t
   *
   *
   */
   virtual RTC::ReturnCode_t onInitialize();

  /***
   *
   * The execution action that is invoked periodically
   * former rtc_active_do()
   *
   * @param ec_id target ExecutionContext Id
   *
   * @return RTC::ReturnCode_t
   *
   *
   */
   virtual RTC::ReturnCode_t onExecute(RTC::UniqueId ec_id);

 protected:

  // Configuration variable declaration
  //
  /*!
   *
   * - Name:  max_linear_velocity
   * - DefaultValue: 0.1
   */
  double m_max_linear_velocity;
  /*!
   *
   * - Name:  max_angular_velocity
   * - DefaultValue: 0.2
   */
  double m_max_angular_velocity;
  //

  // DataInPort declaration
  //
  TimedFloatSeq m_joyInput;
  /*!
   */
  InPort m_joyInputIn;

  // ROS Port
  geometry_msgs::Twist m_rosVel;
  RosOutPort m_rosVelOut;

 private:

};


extern "C"
{
  DLL_EXPORT void JoyRTM2velROSInit(RTC::Manager* manager);
};

#endif // JOYRTM2VELROS_H
実体(.cpp)
// -*- C++ -*-
/*!
 * @file  JoyRTM2velROS.cpp
 * @brief convert Joystick sample port to ROS twist msg
 * @date $Date$
 *
 * $Id$
 */

#include "JoyRTM2velROS.h"

// Module specification
// <rtc-template block="module_spec">
static const char* joyrtm2velros_spec[] =
  {
    "implementation_id", "JoyRTM2velROS",
    "type_name",         "JoyRTM2velROS",
    "description",       "convert Joystick sample port to ROS twist msg",
    "version",           "1.0.0",
    "vendor",            "OTL",
    "category",          "Sample",
    "activity_type",     "PERIODIC",
    "kind",              "DataFlowComponent",
    "max_instance",      "1",
    "language",          "C++",
    "lang_type",         "compile",
    // Configuration variables
    "conf.default.max_linear_velocity", "0.2",
    "conf.default.max_angular_velocity", "0.4",
    // Widget
    "conf.__widget__.max_linear_velocity", "slider",
    "conf.__widget__.max_angular_velocity", "slider",
    // Constraints
    ""
  };
// </rtc-template>

/*!
 * @brief constructor
 * @param manager Maneger Object
 */
JoyRTM2velROS::JoyRTM2velROS(RTC::Manager* manager)
    // <rtc-template block="initializer">
  : RTC::DataFlowComponentBase(manager),
    m_joyInputIn("joy_input", m_joyInput)

    // </rtc-template>
    ,
    m_rosVelOut("cmd_vel", "rtm2ros", m_rosVel)
{
}

/*!
 * @brief destructor
 */
JoyRTM2velROS::~JoyRTM2velROS()
{
}


RTC::ReturnCode_t JoyRTM2velROS::onInitialize()
{
  // Registration: InPort/OutPort/Service
  // <rtc-template block="registration">
  // Set InPort buffers
  addInPort("joy_input", m_joyInputIn);

  // Set OutPort buffer

  // Set service provider to Ports

  // Set service consumers to Ports

  // Set CORBA Service Ports

  // </rtc-template>

  // <rtc-template block="bind_config">
  // Bind variables and configuration variable
  bindParameter("max_linear_velocity", m_max_linear_velocity, "0.2");
  bindParameter("max_angular_velocity", m_max_angular_velocity, "0.4");
  // </rtc-template>

  addRosOutPort("ros_velocity", m_rosVelOut);

  return RTC::RTC_OK;
}


RTC::ReturnCode_t JoyRTM2velROS::onExecute(RTC::UniqueId ec_id)
{
  if(m_joyInputIn.isNew()) {
    m_joyInputIn.read();

    m_rosVel.linear.x = m_joyInput.data[1] * 0.005;
    m_rosVel.angular.z = -m_joyInput.data[0] * 0.010;

    if ( m_max_linear_velocity < m_rosVel.linear.x) {
      m_rosVel.linear.x = m_max_linear_velocity;
    } else if (-m_max_linear_velocity > m_rosVel.linear.x) {
      m_rosVel.linear.x = -m_max_linear_velocity;
    } else if (fabs(m_rosVel.linear.x) < 0.01) {
      m_rosVel.linear.x = 0.0;
    }
    if ( m_max_angular_velocity < m_rosVel.angular.z) {
      m_rosVel.angular.z = m_max_angular_velocity;
    } else if (-m_max_angular_velocity > m_rosVel.angular.z) {
      m_rosVel.angular.z = -m_max_angular_velocity;
    } else if (fabs(m_rosVel.angular.z) < 0.01) {
      m_rosVel.angular.z = 0.0;
    }

    m_rosVelOut.write();
  }
  return RTC::RTC_OK;
}


extern "C"
{

  void JoyRTM2velROSInit(RTC::Manager* manager)
  {
    coil::Properties profile(joyrtm2velros_spec);
    manager->registerFactory(profile,
                             RTC::Create<JoyRTM2velROS>,
                             RTC::Delete<JoyRTM2velROS>);
  }

};
OpenRTM-asit ROSパッチを試す(インストール編)
OpenRTMにROS通信を追加するパッチがあります。
これを使ってみます。
環境はUbuntu10.04、ROSはdiamondbackです。
かなり苦労しました。
http://www.openrtm.org/OpenRTM-aist/html/E3839EE3838BE383A5E382A2E383AB2Frosport.html
ソースからOpenRTM-aistをビルドする必要ああるのでソースをゲットします。
1.0.0です。
$ wget http://www.openrtm.org/pub/OpenRTM-aist/cxx/1.0.0/OpenRTM-aist-1.0.0-RELEASE.tar.bz2
パッチもゲット
$ wget http://www.openrtm.org/pub/OpenRTM-aist/cxx/1.0.0/ros_transport.patch-1.0.1.tar.gz
パッケージの展開
$ tar jxvf OpenRTM-aist-1.0.0-RELEASE.tar.bz2
$ tar zxvf ros_transport.patch-1.0.1.tar.gz
$ cd OpenRTM-aist-1.0.0

これを使ってみます。
環境はUbuntu10.04、ROSはdiamondbackです。
かなり苦労しました。
http://www.openrtm.org/OpenRTM-aist/html/E3839EE3838BE383A5E382A2E383AB2Frosport.html
ソースからOpenRTM-aistをビルドする必要ああるのでソースをゲットします。
1.0.0です。
$ wget http://www.openrtm.org/pub/OpenRTM-aist/cxx/1.0.0/OpenRTM-aist-1.0.0-RELEASE.tar.bz2
パッチもゲット
$ wget http://www.openrtm.org/pub/OpenRTM-aist/cxx/1.0.0/ros_transport.patch-1.0.1.tar.gz
aptでいれたOpenRTM-aistは削除しておきます。
$ sudo apt-get remove openrtm-aist-example openrtm-aist openrtm-aist-dev
パッケージの展開
$ tar jxvf OpenRTM-aist-1.0.0-RELEASE.tar.bz2
$ tar zxvf ros_transport.patch-1.0.1.tar.gz
$ cd OpenRTM-aist-1.0.0
パッチを当てます。
$ patch -p0 < ../ros_transport.patch
そしてautoconfができるようにlibtool.m4を現在使っているシステムのものと入れ替えます(ここ重要)
$ find . -name libtool.m4 -exec cp /usr/share/aclocal/libtool.m4 {} \;
さらにsrc/lib/rtm/Makefile.amの以下の変数を次のように書き換えます。(ここも重要)
(cturtleを使っている場合はこれなくても動くようです)
ros_cflags=`rospack export --lang=cpp --attrib=cflags roscpp`
ros_libs=`rospack export --lang=cpp --attrib=lflags roscpp`
そしたらautoreconfして、あとはお決まりの流れです。
$ autoreconf -ifv
$ ./configure
$ make
インストール
インストール
$ sudo make install
これで/usr/local/以下にインストールされます。
@hyaguchijskさんに協力をいただきました。ありがとうございました。
次にサンプルをmakeします。
$ wget http://www.openrtm.org/pub/OpenRTM-aist/cxx/1.0.0/examples.ros-1.0.0.tar.gz
$ tar zxvf examples.ros-1.0.0.tar.gz
$ cd examples.ros
$ cd publisher
$ make
$ cd ../subscriber
$ make
この状態でpublisherCompとsubscriberCompを動かしてActivateすると
それぞれPub/Subしてくれます。
やっと動いた・・・。

続OpenRTM-aist
引き続きOpenRTMのサンプルを試してみました。
移動ロボットを仮想ジョイパッドで動かすことができます。

やっぱりかなりハマりました。
でも↓のサイトにだいたい書いてあります。
非常に参考になりました。
http://code.google.com/p/rtm-ros-robotics/wiki/RTM_2DSimulator_Example
とくに
$ sudo apt-get install tix
とか、実はバグがあるとか、ハマりどころを押さえていますね。
公式ドキュメントもアップデートしていただきたい所です。
移動ロボットを仮想ジョイパッドで動かすことができます。
やっぱりかなりハマりました。
でも↓のサイトにだいたい書いてあります。
非常に参考になりました。
http://code.google.com/p/rtm-ros-robotics/wiki/RTM_2DSimulator_Example
とくに
$ sudo apt-get install tix
とか、実はバグがあるとか、ハマりどころを押さえていますね。
公式ドキュメントもアップデートしていただきたい所です。
2011年8月11日木曜日
OpenRTM-aistのインストール(自分用メモ)
日本で唯一OpenRTMではなくROS陣営と思われている(?)私ですが、
Electricがリリースされるまでネタがないので、
たまにはOpenRTMやってみようと思いました。
以下はメモ書きみたいなものです。
OpenRTMはまずこれやれ、っていうのがあったら教えてください。
ルンバをOpenRTMで動かせるか教えてください。
OpenRTM-aist 1.00(C++) on Ubuntu 10.04です。
http://www.openrtm.org/openrtm/ja/node/1001
に従いインストールしてみます。
OpenRTMはysugaさんが紹介していますね。
http://ysuga.net/robot/rtm
1.source.listの編集
/etc/apt/source.list.d/openrtm.list
に
deb http://www.openrtm.org/pub/Linux/ubuntu lucid main
2.1.C++版インストール
Electricがリリースされるまでネタがないので、
たまにはOpenRTMやってみようと思いました。
以下はメモ書きみたいなものです。
OpenRTMはまずこれやれ、っていうのがあったら教えてください。
ルンバをOpenRTMで動かせるか教えてください。
OpenRTM-aist 1.00(C++) on Ubuntu 10.04です。
http://www.openrtm.org/openrtm/ja/node/1001
に従いインストールしてみます。
OpenRTMはysugaさんが紹介していますね。
http://ysuga.net/robot/rtm
1.source.listの編集
/etc/apt/source.list.d/openrtm.list
に
deb http://www.openrtm.org/pub/Linux/ubuntu lucid main
を追加。
2.インストール
2.1.C++版インストール
以下のようにしてみました。成功したけど、これで動くかな。
$ sudo apt-get update
$ sudo apt-get install gcc g++ make uuid-dev$ sudo apt-get install libomniorb4-dev omniidl4 ominiorb4-nameserver$ sudo apt-get install openrtm-aist openrtm-aist-doc openrtm-aist-dev openrtm-aist-example
(公式どおりやると以下のようにエラーがでました。$ apt-get install libomniorb4 libomniorb4-dev omniidl4 omniorb4-nameserverパッケージリストを読み込んでいます... 完了依存関係ツリーを作成しています状態情報を読み取っています... 完了E: パッケージ libomniorb4 が見つかりません)2.2.Python版インストールPython版もいれてしまいましょう。2.3.Eclipseとツールのインストール全部入りをダウンロードします。$ tar zxvf eclipse342_rtmtools100release_linux_ja.tar.gz$ cd eclipse$ ./eclipseで起動。3.動作確認次に何やればいいかわからなかったけどぐぐったらでました。
http://openrtm.org/openrtm/ja/content/%E5%8B%95%E4%BD%9C%E7%A2%BA%E8%AA%8D-linux%E7%B7%A83.1.ネームサーバの起動$ rtm-naming3.2 コンフィグ作成$ mkdir ~/RTCwork$ cd ~/RTCworkして、以下の内容でrtc.confを作成.最初のnameserversのところはlocalhostでは動きませんでした。ipv6のせいだそうです。3.3。サンプル実行
以下のようにしてインストールされているサンプルを実行インプット側。$ cd ~/RTCwork$ /usr/share/OpenRTM-aist/examples/ConsoleInComp -f rtc.conf
アウトプット側。
$ cd ~/RTCwork
$ cd ~/RTCwork
$ /usr/share/OpenRTM-aist/examples/ConsoleOutComp -f rtc.conf
(公式はexampsになっているので注意。)
また、必ずcd ~/RTCworkしてください。
あとはEclipseのSystemEditorから接続すればOK!
できたーーー!!

最後めっちゃ端折りましたが、SystemEditorが全く動かなくて困りました。
が、実はrtc.confにlocalhostと書いていたのが原因でした。
うーん疲れた。
あとはEclipseのSystemEditorから接続すればOK!
できたーーー!!

最後めっちゃ端折りましたが、SystemEditorが全く動かなくて困りました。
が、実はrtc.confにlocalhostと書いていたのが原因でした。
うーん疲れた。
PR2 SE発表
Willow Garageの新しいロボットPR2 SEが発表されました。
http://www.willowgarage.com/blog/2011/08/10/announcing-pr2se
新しい、といってもPR2のアームが1本になって安くなっただけです。
でもセンサも新しくなるようです。Kinect搭載かな?
気になるお値段は $285,000 = 約2200万円!
オープンソースへの貢献をすれば3割引なので、
1500万円で買えます。
たしかPR2は$400,000だから、まあまあお得ですね。
これは個人でも手が届く範囲ですね!
って全然無理だな。。。
研究機関ならがんばれば買えるのかな。。。
http://www.willowgarage.com/blog/2011/08/10/announcing-pr2se
新しい、といってもPR2のアームが1本になって安くなっただけです。
でもセンサも新しくなるようです。Kinect搭載かな?
気になるお値段は $285,000 = 約2200万円!
オープンソースへの貢献をすれば3割引なので、
1500万円で買えます。
たしかPR2は$400,000だから、まあまあお得ですね。
これは個人でも手が届く範囲ですね!
って全然無理だな。。。
研究機関ならがんばれば買えるのかな。。。
登録:
投稿 (Atom)